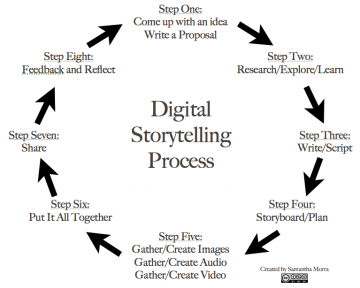

Digital Storytelling: a new spin on an old tale. Creating their own stories or telling stories using digital means challenges students to move beyond being the consumer and instead become creators by adding multi-media to their narratives. That same story also becomes accessible to a broader audience by adding videos, graphics, and audio, through web-based platforms or other applications.
We can also recognize that incorporating storytelling in learning environments helps to support the First People’s Principles of Learning and has been shown to support the preservation of cultural knowledge and tradition in some cases.
A digital story is the use of technology to tell a story (Robin, 2015). It is a process of weaving together oral story, images, sound, and music to create a short film (Lambert, 2010). Within the process, traditional aspects of storytelling are integrated with multiple layers. Digital storytelling is increasingly being used for educational purposes (Robin, 2015), leaving legacy (Hausknecht et al., 2019) and as an approach to preserving cultural knowledge (Cunsolo Willox et al., 2013; Iseke & Moore, 2011).
From: Hausknecht, S. (07/2021). Sharing indigenous knowledge through intergenerational digital storytelling: Design of a workshop engaging elders and youth Taylor & Francis. doi:10.1080/03601277.2021.1927484

Digital storytelling is not limited to personal narratives and the range of topics varies from historical timelines, personal reflections on local or global events, and even exploring the community and sharing one or many perspectives. Choosing to create a digital story allows the creator to choose and expand their audience and increases accessibility and interactivity for the ‘readers’ or ‘viewers’. A story can go beyond the page as readers engage with the visual and auditory elements that a digital story provides.

- The first step is recognizing what type of story your students are expected to share. You can follow Samantha Morra’s Process Model or get inspired by her post. Remember, the options for content are virtually limitless. You can expand this topic to include recounting mathematical discoveries, retellings of famous fairytales, or provide explanations of scientific theories. Here are a few slides co-created with a colleague, Sharon, that helps to outline ‘one process’ for this… Once you have an idea of your story and how you want to share it, then you might start thinking about the medium (digital or otherwise)
- Choose the tool(s) you want students to use to edit and share their work (or allow students to select a tool with which they are familiar). It is helpful for students to have the opportunity to play with the tool and become more adept and familiar with the program before fusing this with their story. We’ve listed some tools below to help you get started.
-
- Digital Publishing: Sway, Book Creator, Storyjumper, Storybird,
- Video: iMovie, Animoto, GreenScreen, Camtasia
- Digital Whiteboard: Explain Everything , ShowMe
- example created by a middle years TC using Explain Everything: Flatworm Evolution
- Graphic Images/Charts: Canva, Piktochart, Haiku Deck slides
- Animation/Comics: Puppet Pals, Stop Motion, Comics (Comic life, Toondoo.com), Storyweaver, VideoScribe
- Coding a story: Scratch, Twine
- Digital Whiteboard: Explain Everything , ShowMe
-
- Plan! Make sure students have a clear goal they are researching or writing about. This could include scripts, storyboards, comic strips, sequences, or even timeframes. You may also want to scaffold students by having them create a storyboard and then a paperslide video depending on their experience.
- Teach about copyright so that your students know where to find and how to cite/attribute appropriate images, sounds, or videos. Access Creative Commons media or record and use your own. For professional images that don’t require attribution visit Unsplash, Pixabay , Pexels. or elementary students might find pics4learning easy to use (with copy/paste attribution). Depending on the device, students can also use Garageband or Audacity to create their own music.
- Create the digital story and select the appropriate audience. If it’s going public, remember to get the appropriate permission forms signed that may be district dependent. Be aware of student ages and also where the website or application is based because they will follow different privacy laws.
- Provide feedback through peer evaluations, self-evaluations, and even a rubric that students can use throughout the creation process. Visit this link to Kathy Schrock’s Guide to Everything for some sample rubrics and additional resources.

Watch this video to preview a variety of tools being used to create digital stories.
Video: Hans Tullman (2015). Digital Storytelling by Hans Tullman.
Or this interactive Genially presentation by Tamara, Peer Mentor 2023, highlighting several different multimedia tools (with examples and hyperlinks).


