
There are many ready made editable templates of virtual reality tours. This video tutorial takes you step by step through editing an existing template. This might be especially relevant for Social Studies and Science teachers.
There are many ready made editable templates of virtual reality tours. This video tutorial takes you step by step through editing an existing template. This might be especially relevant for Social Studies and Science teachers.
This video provides an overview of Google Tour Creator and possibilities for its use in the classroom. We explore the library of ready made tours and we showcase one of the examples. For a ‘text’ overview of this application, please visit our resource here.
Below are links to some of the things we visit:
Communication is a large part of what teachers do and it is important that we consider how we communicate, what we communicate and with whom.
Working with Dawn Allen and her EDUC 450 Inquiry classes provided an opportunity to consider professional communication from different standpoints. Dawn and I discussed how communication as a BEd student might look different from communication as an undergrad and definitely looks different from communication as a Teacher Candidate on practicum (and later, we hope, early career teacher).
To that end, we engaged students in a session we called “Professional and Practitioner Use of Blogs and Digital communication platforms” – a real mouthful but, really, more an opportunity to co-create our understandings through discussion about online communication and the potential value of developing a Professional Learning Network (PLN) and a professional online presence.
We looked at examples of how BEd students have shared their inquiry using various digital platforms including Twitter, Blogs, Tumblr, Instagram and even Facebook. As we looked, we discussed the inquiry process and how we evaluate digital technologies. Following this, students had the opportunity to work in groups to design their ideal class blog using copies of the existing cohort blog in UBC Blogs WordPress. Students took this opportunity to ‘play’ in wordpress and consider what kinds of design features they (or their own students) might want in a class blog. I appreciated the willingness of students to learn in a collaborative, playful way! Thank you!
Below are some resources from our session.
Some info and Brief video tutorials to help you if you decide to set up your own UBC Blog.
Inquiry posters from Trevor MacKenzie
The SAMR Model Video – evaluating our use of digital technology in the classroom.
BC’s classrooms and school populations are evolving which includes a growing number of English Language Learners who are entitled to support. To help Teacher Candidates in LLED 360 begin to consider this need, we worked with some instructors and their classes with some digital tools that will help ALL students, including ELLs.
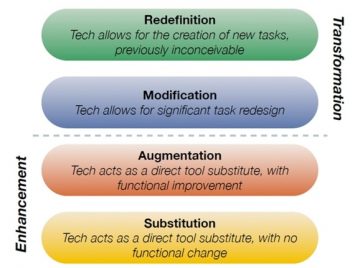
Image the creation of Dr. Ruben Puentedura, Ph.D. http://www.hippasus.com/rrpweblog/
We discussed the theory behind selecting tools – specifically for ELLs and inclusive educational environments – by creating the distinction between tools for instruction and tools for learning. This was followed by taking that knowledge and applying it to the needs of ELLs based on their language proficiency levels. I also want to add that the class brought up the importance of a teacher evaluating a digital tool using the SAMR model. (Watch this SHORT video)
Afterward, we launched into Padlet to access TCs background knowledge on Digital Technologies and how they are currently being used in the classroom. This activity frames our conversations but also models how you can engage a Language Learner by giving them models to read, vocabulary to borrow, and time to think before providing an answer.
Padlet allows the creator to curate responses (a.k.a posts) and then select what format to view them in – we used a Wall so everyone could post at the same time but then we transitioned it to a Stream so that we could read responses one at a time. We then looked at other features of Padlet and discussed how it specifically supports ALL learners in a classroom. We also saw that the teacher is able to moderate the wall – a valuable affordance! A low tech version of this would be sticky notes or placemats or writing on the walls… with the limitation that not all learners can see at a glance the contributions of others… That said, it also allows for more movement when we write on the walls or circulate in a gallery walk!
In Margaret Early’s section, she introduced REWORDIFY – an online application that allows users to enter text and simplify it. This is great for teachers to adapt text for their students so that they can access the content and recognize key content vocabulary.
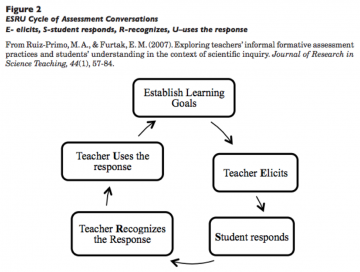
The second portion of her class focused on Student Response Systems (SRS) and specifically how using the ESRU model allows these digital tools to be used for formative assessment (read more on the ESRU model HERE). Margaret and I each led a session based on groups modeled after classroom stations.
The Student Response System/All-class response or SRS tools we tried out where Plickers and Socrative, The third option, but we ran out of time, was for TCs to self-teach themselves Kahoot or Quizalize. The big takeaway is that these tools don’t have to be used only for summative assessment at the end of a lesson. They can be used for a K/W/L (know, wonder, learned), as a temperature check to immediately find out who needs support or to change the direction of a lesson, or as an exit ticket to inform the teacher of what to review or spend more time on in the following lesson.
We also had some great questions brought up in class regarding screen time and youth. After discussing with Yvonne, she recommended Screen Time for Young Children and Digital Media and screen time Guidelines for children and youth from the Canadian Pediatric Society which discusses this concern. I’ve also included a Canadian Guidelines of Physical Activity because it includes recommendations for teens, not just young children. Teachers can also educate their own students about appropriate uses of technology and model the transformative creative aspects it provides.
Slides from Margaret’s class:
In Kyle Stooshnov’s section, we focussed on multi-modal student response using ‘WhiteBoard style applications’ including Explain Everything, Showme and Puppet Edu which are common apps in local districts. We took the time to ‘play’ with Showme since it’s a free option TCs could download.
Using a Digital Whiteboard in a group allows TCs to practice their oral language as they worked together to accomplish a specific task. TC’s were challenged to use the ShowMe App to share how to make a paper airplane as a way to explore the benefits (and challenges) of using Digital Whiteboards. They were able to take photos, add text, draw their own arrows and if we had more time they would have also been able to narrate their presentations in-app.
Lastly, we discussed the resources available on the Scarfe Digital Website. We appreciate all the feedback TCs provided so we can make changes and improve it.
The slides below were used in Kyle’s class and include Digital Whiteboard resources which differ from the slides used in Margaret’s class.
Another approach we discussed was incorporating a ‘backchannel’ for students to ask their questions or make comments as they occur to them during a lesson. The teacher might watch the channel or simply review it afterwards and address it later in the lesson or the next day… There are many tools to help with this approach including some of those explored for All-Class Response. A backchannel can provide ‘student voice’ by letting them post questions throughout without needing to raise their hands or feel like they’re interrupting. It can also provide some anonymity for learners and some formative assessment for the teacher. In conversation with some school district admin, learning to leverage the backchannel was mentioned as valuable for early career teachers. Recognize that it exists and leverage it when possible.
When selecting a tool, consider carefully your needs, access and whether it is valuable for students to view the responses of others in real time or if it is better for only the teacher to see responses (i.e. moderate responses). Deciding on your purpose and knowing which tools afford which options is important. Teams or Google Classroom are in use in many SDs and will provide backchannel options.
A NO TECH version of a backchannel chat could be a question box or a parking lot poster on the wall. Students have sticky notes, cards or notepaper and record questions as they occur to them. Students can share their notes in the box or on the poster during a break or as they wish/need to move (when and how they share depends on their needs and yours… are you comfortable with students standing and moving while you are speaking or while others are speaking? do you have students who NEED regular movement breaks? can you schedule a time for everyone to move? Another NO TECH approach is a snowball – students record their ideas/questions and crumple and toss… a bit chaotic but, depending on your needs and the environment, valuable!
It was a pleasure working with the group of soon to become Educators! If you’d like to explore anything related to teaching, learning and digital technology further, please be in touch or click the ‘Ask a Question’ link in this blog.
Padlet Instructions | Socrative Instructions | Plickers Instructions | Kahoot Instructions| Quizalize Getting Started Guide
Walking away from this afternoon’s session working with Secondary Jr. Science Methods TCs and their instructor Leslie Johnstone, I realized I hadn’t taken a single photo to help capture the engagement in the classroom. Ah, well, the moment will live in my brain at least ;D. Below are some promised links and notes about our session. 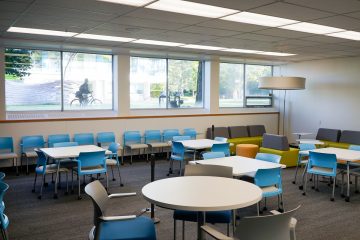
We utilized one of the Scarfe Teaching and Learning Studios (Scarfe 1007) to provide a stations based approach allowing some student movement and choice (and to be sure students know that these ‘student priority’ spaces are available for them to use!). After a brief introduction in Prezi to five themes of technology integration, students had 10 minute opportunities to dip their toes into each theme at facilitated and self-directed stations.
Remember, in a Secondary Science classroom, especially if students are new to cooperative learning, I would advise creating groupings in advance of class. The groupings might be homogeneous or heterogeneous and based on any number of factors including ability or interest depending on the objectives of the teacher and the needs of the students. Sometimes, randomized groupings can be used and have the added benefit of introducing students to opportunities to interact with many different members of the class. There are many online options. GroupMind, a lovely little App developed by Louai Rahal an Education PHD student & instructor I met a few years ago, is free and open for you to use with no sign up required. For more on groupings, this article by Beatrice A. Ward (1987) is worth a read.
Our themes:
It was a pleasure working with the group of soon to become Educators! If you’d like to explore anything related to teaching, learning and digital technology further, please be in touch or click the ‘Ask a Question’ link in this blog. Look for Eric in the foyer on Wednesdays or visit Janis or Yvonne in a drop in or workshop sometime this winter! Schedule here.
Cheers!
Yvonne
