In short, Google Cardboard is an affordable piece of Virtual Reality (VR) headgear that welcomes its users to simple yet eye-opening VR experiences. Following just a few easy steps, anyone with a smartphone (and a few free VR apps, of course) can now explore the VR content shared by creators worldwide. As the name suggests, this headgear can be built from low-cost materials that are relatively easy to find, so if you are up to the challenge, you can even make one yourself!
It may not be as high quality or immersive as the more expensive VR set ups (like the HTC Vive that you can use at UBC’s Emerging Media Lab) but it is fun to use and still brings quite a ‘wow’ factor to the table, especially considering its price.
Note: All of the apps linked below are FREE at the time of this resource posting.
Pro tip: This video demonstration will guide you through the process quite quickly. For a brief overview of what is involved in making the glasses, see the instructions below.
What You’ll Need
Pro tip: 45mm biconvex lenses: available for purchase online. Search Amazon, eBay or other sources. They are about 70cents each lens but you can sometimes also find them in bulk. We’ve never tested the theory that you can even make your own lenses but there are instructions available online. See below for video how to.
Ring Magnet or elastic and velcro: You don’t really need the ring magnet or elastic, they are nice additions though. The magnet is used as a button because you cannot click the screen while you have the glasses on. The velcro can also be substituted with regular tape. Magnets are about 0.75in (19mm) diameter and 0.12in (3mm) thickness, and can be bought on Amazon or at Home Depot.
Step 2: Cut out your template and stick your outlined pieces together placing sections with numbers in white circles on top of those with matching numbers in black circles.
Step 3: Trace your pieces onto your cardboard (cereal box works well).
Step 4: Cut out your cardboard outlines.
Step 5: Fold your cardboard pieces along the red lines indicated on the template.
Formerly known as Vrse, WITHIN showcases the best VR video has to offer. The content on display in this app spans a variety of genres and is collected from a number of reputable VR sources. It features documentary and news content from the likes of Vice, the New York Times, and the Huffington Post, comedy and short films from creators and animators like Saturaday Night Live, and music videos from artists like U2.
inVR
The easiest way to create and share VR experiences.
inVR is a “platform for sharing VR experiences”. Users can create content using any 3D modelling software and uploading it to the inVR cloud for other to experience. Whether you are are a 3D artist or animator, or just an avid VR explorer this is a must-try.
NYT VR
An immersive virtual-reality experience.
Journalism has come to VR! NYT VR offers an immersive and thrilling experience as award winning journalists capture their experinces in 360 video for the world to see. Be a Syrian refugee, an earthquake survivor or rescue worker in Nepal, or watch the burning of ivory in protest of elephant poaching in Kenya. Videos are posted on a monthly basis.
Discovery VR
A new way to see your world.
View behnid-the-scenes footage from Discovery shows among other immersive video experiences as videographers show you all our planet has to offer. From the depths of the ship wrecked oceans to survival in the rainforest this app has action and adventure to share.
RYOT
Become the story.
The Huffington post brings you RYOT, a step into a new age of reporting. Like NTY VR, RYOT journalists and videographers capture their experiences at imporant events in some of the worlds most interesting places.
Shakespeare’s Globe 360
Step inside the world of the Globe Theatre.
Explore Shakespeare’s Globe Theatre in VR. Take a look around and interact with the virutal environment to learn more about the theatre and acting in Shakespearean times.
Content creation for educational purposes differs from our usual understanding of content creation for the web. We have to take into consideration that the audience is no longer a faceless public, but rather a classroom of learners and parents. So although we are creating shareable and editable videos, images, text, presentations and so forth, you might not want to use the same software used for a primarily web audience. The resources presented here have been selected for their educational value.
Of course, here at UBC, students and faculty have free access to UBC Blogs and UBC Wiki for content creation and storage but there are many more spaces ‘out there’. Take a moment to check these and others out out. Find a space that works for you or share your own favourite space by commenting! *while all of the applications listed below have some kind of free access, these are not all ‘open’ resources.
Interested in digital storytelling? Find some cool tools and share your stories at 50Ways to tell a story.
Self-publish your own digital children’s books for FREE ePubBud
Store and share your own teaching resource ‘binders’ (basic membership free) at LiveBinders
*Visit this pbworks wiki page for an introduction to livebinders.
TeachAde is an online community for educators that allows lesson storage, sharing and discussion – a potential commmunity of practice
Pinterest is a space where you can store and save images for inspiration or use.
Teachertube allows users to upload educational video content – this site tends to be ‘free’ of the type of ads found on other popular ‘tube’ sites (IMHO, a ‘safer’ bet for housing and displaying content for students!)
While Edutopia doesn’t afford the ability to archive your own material readily, you can access a variety of resources, blogposts, articles and even join the conversation in their blog space.
TeachersNet allows you to share your own ideas, learn from others and participate in dialogue through chatboards.
Participate in the co-creation of knowledge on Wikieducator which also allows you to save ‘books’ of content
See this list of Top 10 Social Network sites for teachers… more on this later when we explore Personal Learning Networks!
Feeling really brave? Try creating or co-creating your own course – MOOC – see this guide for a how to on mobile moocs.
*Please note that most spaces (with the exception of UBC blogs/wikis) are housed on American servers and, in accordance with FIPPA, you may not upload and share student content or images without explicit permissions.
**Always check copyright and attribute where needed before sharing content you didn’t create yourself!
Integrating Digital Technologies in classroom practice is an ongoing ‘project’ or challenge for educators. As someone who has been teaching for 25 years, I am still ‘on the road’ to mastery and shared in class the story of my rather bumpy start on the road. I had the pleasure of working alongside Wendy Zhang, TLEF coop student, and Mary Kostandy, GAA for our “Enhancing Digital Competencies of Secondary Teacher Candidates” TLEF project with the students in Junli’s LLED361 class here in the Faculty of Ed as they continued their journey – thanks to this wonderful group for their interest, questions and critical lens.
Students in LLED 361, Literacy Practices and Assessment, are engaging in readings, discourse and interactivities around the notion of ‘multiliteracies’ and multimodal teaching and learning contexts (including the digital world in which many of our students are immersed). In our session, Secondary Teacher Candidates were asked to consider Backward Design/UDL and effective technology integration models including TPACK , SAMR and TECH (a more student-centered model/approach) and then go on a self-directed ‘treasure hunt’ of the Scarfe Digital Sandbox Blog in search of something they might incorporate in their own teaching context. TCs were then given some time to actually ‘try out’ the digital technology so that they might consider the problems and possibilities. Below are some ‘artifacts’ from our session (Slides and links still to come… patience please! it’s been a busy few weeks in the sandbox ;D Check back by Friday for more)
In closing, we used two different polling applications. Answer Garden and Poll Everywhere.
View our ‘word cloud’ of responses in this ‘answer garden’View our poll results – “How would you use one of the applications you found in the blog in your own teaching context?”
Some additional Resources:
Interesting article with some research and background re: TPACK
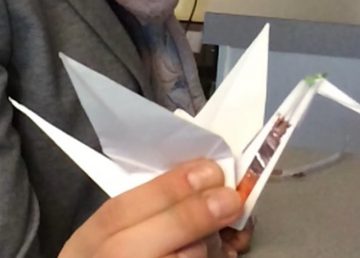
Paper circuits are easily constructed with different combinations of conductive material glued to or laid over paper. Materials may include conductive copper tape, conductive thread, insulated wires, paper clips, bulldog clips, pencil lead, virtually anything that allows electricity to flow. Combining these with 3V lithium batteries, LED lights, buzzers, etc. creates endless possibilities of circuits. Projects include light up badges, origami, greeting cards, bookmarks, you name it! We’ve even made origami paper circuit creations!
Paper circuits are a great way to introduce and explore conductivity and electricity with children, in quick and fun projects, with practical and immediate results. With a range of materials to work with, it’s easy to get started. Projects can range from ‘follow the instructions’ to more inquiry based explorations.
Paper circuits activities allow students to problem solve, tinker around, and get creative by combining science concepts into art projects. When the LEDs light up, it’s guaranteed to put a smile on every face!
Taking and editing your own photographs can be a challenging, yet rewarding way to enhance your web spaces. Further, this virtually eliminates copyright issues! Still, if you are looking for web content you can use, here are a few places to look:
Creative Commons Image Search NB: you still need to be aware of licensing requirements and generally attribute the work to the author. ALWAYS read and learn before you use!
Public Domain Image Search *always check the image sources and ensure the image is in the public domain.
Pixabay – allows immediate sharing to various social network sites including Facebook and Twitter. Some high interest and high quality images. Many are free with no attribution required. This site also links to high quality stock photos you can pay to use.
UnSplash – high resolution photos, free to use (even commercially) no attribution required (always appreciated though)
freefoto.com is one I like to use with younger students when developing digital stories or web-based projects
http://www.public-domain-image.com/
Various governmental sites offer high quality images – always attribute source and note any special licensing requirements in their FAQ or About pages. These can be particularly helpful for Science and Social Studies!: NOAA photo library (National Oceanic and Atmospheric Administration) ; US Library of Congress ; NASA ; Archives Canada ;


 Materials may include conductive copper tape, conductive thread, insulated wires, paper clips, bulldog clips, pencil lead, virtually anything that allows electricity to flow. Combining these with 3V lithium batteries, LED lights, buzzers, etc. creates endless possibilities of circuits. Projects include light up badges, origami, greeting cards, bookmarks, you name it! We’ve even made origami paper circuit creations!
