My Maps is an online platform by Google that allows you to personalize your Google map and also add multimedia information to different locations. It is important to consider student data privacy when using non-Canadian housed resources (FIPPA). In some cases, school districts have permissions in place for the use of google classroom, while in others, it would be wise to have students utilize a class login if adding to the map (and, of course, ensuring this is appropriate in your district/school). It is important to ensure students develop digital literacy and know what kind of information is safe to share and what isn’t. Valuable contextual learning can take place when students have the opportunity to create in online environments at school with a teacher who is conscious of the issues and possibilities.
My Maps can enhance place-based learning and learning about place by providing a space for students to upload images, text and audio connected to a specific location in the world. They can be used by teachers to create guides or presentations for students allowing them to explore and discover different areas and information. Creators and contributors of maps can tie in their own images to create a more personalized and interactive experience than a more linear slideshow or video affords. Viewers of the map can click on the tags including text, videos, and weblinks, creating a more interactive and non-linear experience than a more traditional presentation, video or slideshow might afford.
One example of an excellent use for an online collaborative map is this Eco-poetics project: Poems from the Garden.
Creating a map
Sign into your Google Account.
Click on “Maps” (Depending on your browser, you may need to select the ‘gear’ icon after logging in before you can see ‘My Maps’).
from the ‘menu’, select ‘your places’ and select ‘Maps’ – scroll to the bottom, select ‘create’.
Title the Map.
Select your privacy option for the map using the sharing icon (public, private, viewable or editable by anyone with link or by invitation, etc)
Public (shared with everyone online)
Unlisted (shared only with people to whom you provide the URL/Map address)
Share the URL of your map.
Click on ‘Link’ in the upper right-hand corner of the map. You can copy the link and share it with others. You may even copy the ‘embed code’ and paste it into your website.
NB: Individuals with the URL can view the map but cannot edit the map (i.e. add markers) unless they are logged into their Google Accounts.
Adding a marker
Login to My Map.
Find your location.
Zoom in to your location (using the +/- or by double clicking on the map) or find your location using the ‘Search bar
Select the ‘Marker’ tool (from the toolbar below the search bar).
Click on the location where you would like to place the marker.
Type your title and description.
Add an image.
Change the icon to one of many custom icons in the app.
Teaching Tip: To help protect student privacy, create a class Google account that students can use to login so that they do not need to set up and use individual Google accounts.
For this assignment you will be using Camtasia software available for free to all UBC students through CONNECT to create educational videos through editing available raw science teaching videos. Videos will be housed on the STEM Education For All Youtube Channel.
For your video please follow the assignment checklist:
UBC signature video in the beginning of video.
Project signature slide followed by filled out video topic slide (exported as images from the PPT template).
Acknowledgements slide at the end of the video.
Use the “Fade” transition between slides and video.
Use the soundtrack provided as background music for the slides (audio was downloaded from PremiumBeat.com and does not require attribution).
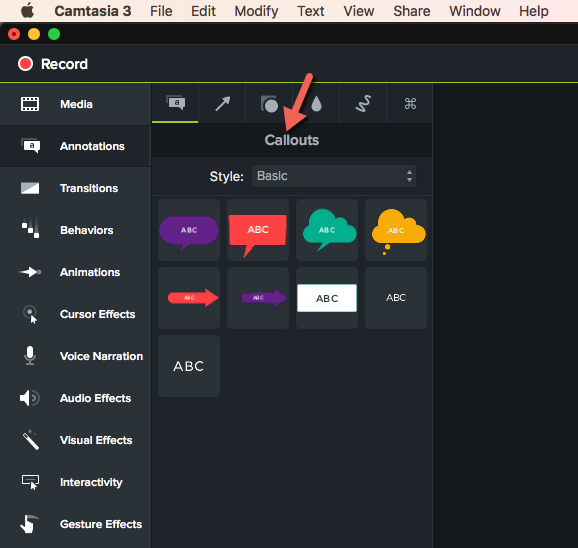
Annotate (using callouts, arrows and lines) the raw video to emphasize key terms, concepts or elements.
There are many outstanding educational STEM videos available on YouTube and other online sites. These videos are great teaching resources for you and your students. They are especially valuable for flipped classrooms that are becoming more and more common in British Columbia and around the world. As a 21st century teacher you will want to create your own videos that address the needs of your students. A teacher who knows how to create his or her own educational videos using a video editing software, such as Camtasia, has a very useful skill under their sleeve. The goal of this workshop is to introduce you to Camtasia so you can become such a teacher.
For this project many of you will be using lab computers, but you can replicate this process on your personal device.
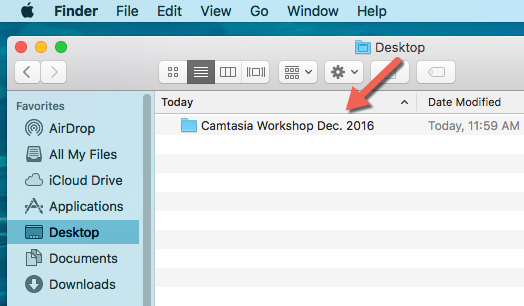
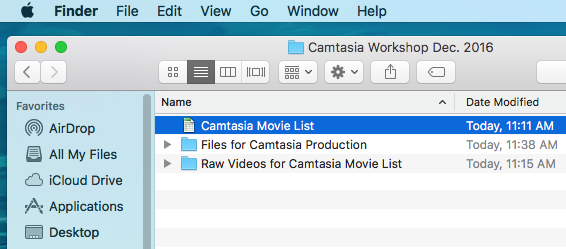
Locate your movie file (if you are using a file created by Marina, select one from folder “Camtasia Workshop Dec. 2016” on the desktop of the lab computer and open the file “Camtasia Movie List”.
Choose the topic you will be working on and locate the associated video file in the folder “Raw Videos for Camtasia Movie List”.
Prior to starting your presentation, view the raw video and make note of important vocabulary (consider ELLs as you do this).
Additional files needed for producing the video can be found in the folder “Files for Camtasia Production”. These include the UBC video Brand Tail, PPT template and music file.
Open the STEM Video template and customize it for your video / topic (insert images/video screenshots into image placeholders).
Export your PPT slides as images in .png format
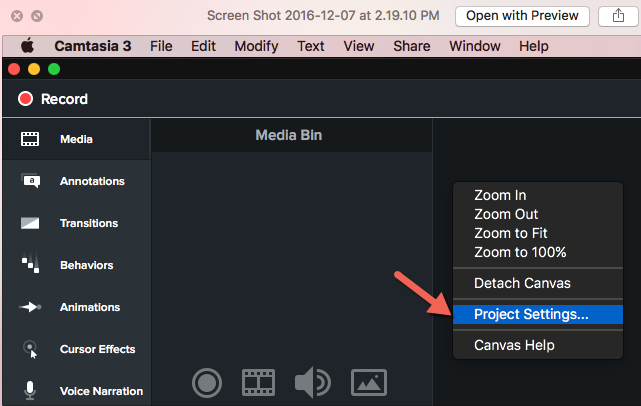
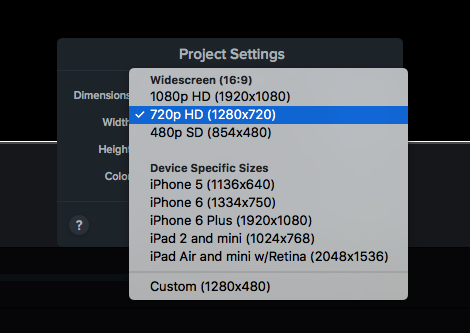
Change project screen dimensions to 720p HD (1280×720)
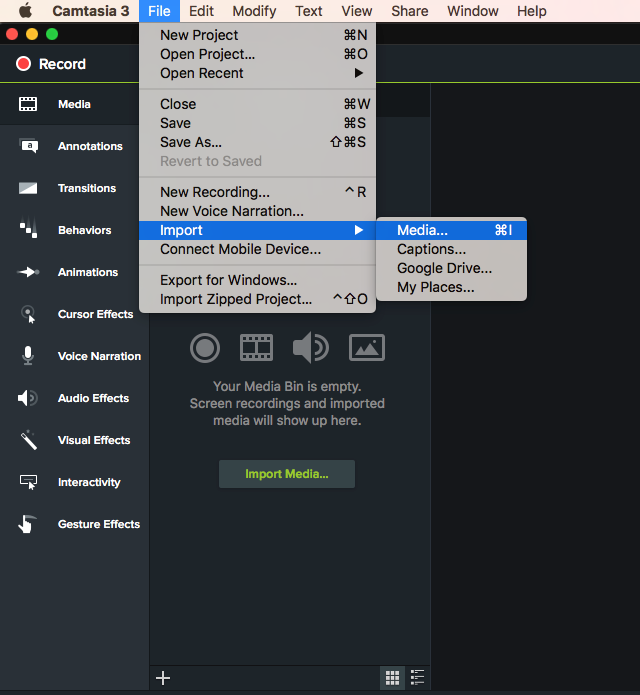
Import all your media (video, audio and images) into Camtasia.
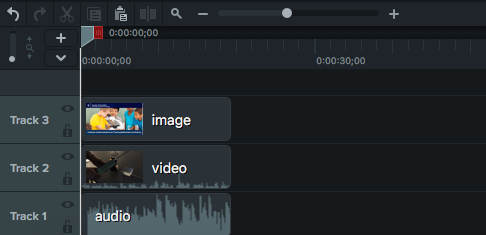
Add media to timeline. Note: keep different media file types on separate timelines for ease of editing.
Annotate your video using callouts, arrows and lines.
Save your final work.
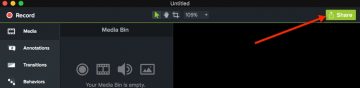
Click on the SHARE button to Export your file as a video in .mp4 format.
Name your file (see example on whiteboard for naming protocol)
Sphero – a programmable robotic sphere that is not only fun to play with but also an excellent access point for students of any age to explore coding. Sphero can be paired with a smartphone, ipad or tablet and coded using ‘visual programming blocks’. While the apps that help power Sphero are free, the Sphero itself is not inexpensive. I’ve also been experimenting with ozobots that offer some of the same functionality at a lower price and can be coded with visual blocks, java script and python allowing for differentiated coding opportunities!
“Sphero engages students in a hands-on learning experience that can challenge them at different levels. The remote robot provides an interactive platform to develop competencies in planning, problem solving, testing, and making. Students have the opportunity to collaborate to programme Sphero to follow certain paths. By using Sphero students can become familiar with using block coding, angles, measurement, time, distance, and speed.
With a variety of control methods, Sphero can be used for a variety of ages and classes. Sphero can enhance student learning in physics, math, computer and technology, and robotics classes. It is a great introduction to coding where students can see the results of their work right away as they take on different challenges.” ~ Bryce Kicia, Secondary TC BEd 2017 (who used Sphero on practicum)
Consider creating a ‘design challenge’ using Sphero as the motor (The Sphero website has an example of a chariot challenge.. Consider: How can you/your students take this to the next level? Perhaps open up the challenge to include any type of vehicle (yes, the sphere is also waterproof!). Students can work together to use the iterative design process to design and create their own land or water vehicles using various found materials and then use the Sphero as the motor to test their prototypes. Once satisfied with the vehicle, they can then program a path using drag and drop programming (use of such programming language is included in Grades 6 – 9 of the BC ADST curriculum and can be incorporated even in the early primary years). A group of grade 4 students in Langley recently created their own games using sphero.
Once you’ve purchased a Sphero, download one of the free apps (itunes or google play). I recommend ‘draw and drive’ as a good starting place – to get used to how sphero moves. From there, I like ‘lightning lab’ to begin coding!
Be sure to visit the Sphero Edu website for access to a wealth of resources you can use to plan, prepare and teach.
There are many assistive technologies available for teachers and their students. In terms of studying, digital technologies can include mind mapping, audio and text note taking tools and studying and quizzing apps. Sending students any materials, including slides, in advance of class or after class, can also support students when they are preparing assignments or studying.
Employed effectively, these digital technologies can help all of your students find success. In particular, students with learning challenges or exceptionalities will be able to engage, complete assignments and prepare for future learning opportunities. Ensuring equitable access to learning and demonstrating learning for all students is an important component of teaching in today’s diverse classrooms.
There are many assistive technologies available for teachers and their students. In terms of communicating, digital technologies can include augmented and alternative communication apps, text to speech, text to sign language tools and closed captioning.
These digital technologies can assist your students, particularly those with written and/or verbal communication challenges. Providing options for students in how they share their learning can support equity in the classroom – ensuring access for diverse learners.
There are many resources that you can use in your classroom to afford multimodal communication opportunities for students and also assist students with exceptionalities. Below are only a few examples. Simply click on the name of the resources and you will be direct to the resource posts on Scarfe Sandbox or a concise introduction video! All of these tools are either free or with relatively low cost (less than 5 CAD).